
QuickBooks Install Diagnostic tool is a tool designed by Intuit to fix the errors which come while installing QuickBooks Desktop. It can also fix the error that can appear due to .NET Framework, the MSXML, and C++. It identifies and resolves installation errors automatically. Download and installation of this tool can help to fix all the installation errors.
What can QuickBooks Install Diagnostic Tool Do
QuickBooks install diagnostic tool has the ability to fix all types of installation errors. Here we have given a list of errors, which can be fixed by the tool;
- Error 1402
- Error 1722
- Error 1603
- Error 1935
- Error 1903
- Errors related to damaged MSXML and C++
- Microsoft .NET Framework errors
- QuickBooks has stopped working error messages while opening QuickBooks Desktop.
System Requirements to Install QB Install Diagnostic Tool
If you are going to install the QuickBooks install diagnostic tool, then before start installing you should know about the need to install it.
- The latest version of Windows.
- Microsoft .NET framework
- Microsoft Visual C++ redistributable package
- High-Speed internet connection
How to Download and Install QuickBooks Install Diagnostic Tool
Before downloading and installing this tool, you have to make sure that you have good internet connectivity. Then, follow these steps.
- First of all, Go to the Intuit website to download the QuickBooks Install Diagnostic Tool.
- You have to save the QuickBooks install diagnostic tool file to the desktop.
- Now, you can see the QBinstall _tool_v2.exe file on your computer screen.
- Then, close all the running programs on your computer.
- You must press double click on QBinstall _tool_v2. .exe file to start the installation.
- After that, you will see a License Agreement come on the screen, then, click on the Yes button.
- Your system has successfully installed the QuickBooks Install Diagnostic Tool.
- In the end, you have to restart your computer to save all the required changes.
- Now, you have installed the QuickBooks install diagnostic tool successfully on your computer.
Things to Know, After Download Install Diagnostic Tool in QuickBooks:
Some important points you should keep in mind, after downloading this tool.
- When you have downloaded the tool on your system, then close all the running programs and click the file to start this utility.
- This tool will identify and fix errors automatically, but somehow you have to reboot your system.
- When you see a message like No errors were detected it means your problem has not been solved.
Procedure to Fix Installation Error in QuickBooks Desktop
If you are facing errors while installing QuickBooks desktop, then follow these steps to fix this error.
Step 1: Download the QuickBooks Tool hub
With the help of these steps, you can download the QuickBooks Tool hub.
- First of all, close QuickBooks Desktop, even all the running programs.
- Then, download the latest version of QuickBooks Tool Hub. (Latest version of tool hub- 1.5.0.0)
- The file will be on the QuickBooksToolHub.exe form.
- Save the downloaded file in a place, where you can easily access it.
- In the next step, open the downloaded file QuickBooksToolHub.exe file.
- After that, QuickBooks will show you some on-screen instructions, and follow them.
- And agree with the terms and conditions.
- After that, a popup will display on your computer screen with the License Agreement, you need to read this and click on the Yes tab to accept it.
- Now you have to choose the destination location for QuickBooks Tool Hub and click on the Next button.
- Then, you have to click on the Install option, to start the installation.
- In the end, you should click on the Finish option.
- When the process is completed, you have to open the tool.
Step 2: Run QuickBooks Install Diagnostic tool:
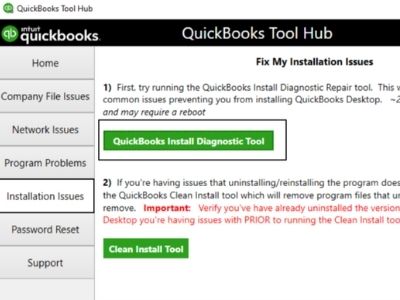
- First of all, you have to open the QuickBooks Tool Hub.
- There you can find different sections to fix different errors in QuickBooks including tools (file doctor, database server manager, automated password reset tool, etc.)
- You have to choose the Installation Issues option.
- Go to the QuickBooks Install Diagnostic Tool and run it.
- When the process is completed, restart your computer.
Step 3: Update the Window
- Firstly, you have to update your Window from Microsoft.
- When the update is completed, then restart your computer.
- Then, install QuickBooks Desktop again.
- After that, you can open your QuickBooks and company files.
Step 4: Fix Windows Components Manually
If the error continues, you can repair Window components yourself. You have to do these steps and ensure about the .NET Framework.
Fix .NET Framework:
Follow the procedures for Windows 10, 8.1, 8, and 7;
Fixation for Windows 10, 8.1 and 8
If you are a user of Windows 10, 8.1, and 8 then, find the list of .NET frameworks, and follow the procedures;
- First of all, you must Close all the open programs.
- Then, go to the Windows Start menu.
- In the search bar, type Control Panel and open it.
- Choose the Programs and Features option.
- You have to choose the Uninstall a Program.
- Click on the Turn Windows features on or off option.
- You can get .NET Framework on the list.
- Check .NET Framework 4.5(or later)
(i) If the checkbox .NET Framework 4.5(or later) is already checked.
- You have to tick mark the checkbox to switch off .NET Framework 4.5 (or later). And, don’t switch on it again.
- Then, click on the OK button to save your changes.
- You must restart your system.
- If you’re logged in back into Windows, follow these steps to switch on .NET Framework 4.5 again.
(ii) If the checkbox .NET Framework 4.5(or later) is not checked.
- You have to tick mark the checkbox to switch on .NET Framework 4.5(or later).
- Then, click on the OK button to save your changes.
- And, restart your system.
- Check .NET Framework 3.5 SP1
(i) If the checkbox .NET Framework 3.5 SP1 is already checked.
- You have to tick mark the checkbox to switch off .NET Framework 3.5 SP1. And, don’t switch on it again.
- Then, click on the OK button to save your changes.
- You must restart your system.
- If you’re logged in back into Windows, follow these steps to switch on .NET Framework 3.5 SP1 again.
(ii) If the checkbox .NET Framework 3.5 SP1 is not checked.
- You have to tick the checkbox to switch on .NET Framework 3.5 SP1.
- Then, click on the OK button to save your changes.
- And, restart your system.
Fixation for Windows 7
- First of all, you must Close all the open programs.
- Then, go to the Windows Start menu.
- In the search bar, type Control Panel and open it.
- Choose the Programs and Features option.
- You have to choose the Uninstall a Program.
- Click on the Turn Windows features on or off option.
- You can get .NET Framework on the list.
- Check .NET Framework 4.5(or later)
- You have to choose Microsoft .NET Framework 4.5 (or later), in the Programs and Features window.
- Then, click on the Uninstall/Change.
- Choose the Repair option and click on the Next button.
- After that, you have to follow the instructions that are showing on your screen.
- If the repair process is completed, then restart your computer.
- Check .NET Framework 3.5 SP1
(i) If the checkbox .NET Framework 3.5 SP1 is already checked.
- You have to tick mark the checkbox to switch off .NET Framework 3.5 SP1. And, don’t switch on it again.
- Then, click on the OK button to save your changes.
- You must restart your system.
- If you’re logged in back into Windows, follow these steps to switch on .NET Framework 3.5 SP1 again.
(ii) If the checkbox .NET Framework 3.5 SP1 is not checked.
- You have to tick the checkbox to switch on .NET Framework 3.5 SP1.
- Then, click on the OK button to save your changes.
- And, restart your system.
Repair and Reinstall Microsoft MSXML
Follow these steps to repair or reinstall Microsoft MSXML.
- Register the MSXML DLL files
If you have the 64-bit operating system, register MSXML with the following steps;
- First of all, go to the Windows Start menu and type cmd.
- Press right-click on the cmd then choose the Run as Administrator option.
- At the C: prompt, you have to enter cd\windows\syswow64.
- You must type regsvr32 MSXML6.dll and press the Enter tab.
- After that, install QuickBooks Desktop.
If you have the 32-bit operating system, register MSXML with the following commands
- You have to press Windows+R to open the Run command.
- Then, type cmd and press the Enter tab.
- You must type regsvr32 MSXML6.dll and press the Enter tab.
- After that, install QuickBooks Desktop.
- Repair MSXML 6.0
When installing QuickBooks Desktop from a download file:
- First of all, you have to download the msxml.msi file and save it on your desktop.
Windows 1o, 8.1, 8, 7 or more:
- Move to the Windows Start button.
- In the search bar, type msiexec.exe /fvaum “%userprofile%\desktop\msxml.msi and press the Enter tab.
- When MSXML 6.0 installation is completed, then install Quickbooks Desktop.
When installing QuickBooks Desktop from a CD drive:
- You have to insert a CD into the CD drive.
- Then, start the MSXML installation process.
- Click on the Windows Start button and choose the Computer option.
- You have to open the CD drive, and then open the ThirdParty folder.
- After that, open the MSXML 6 folder.
- Launch the msxml6_64.msi for a 64-bit system. Or, launch the msxml6_86.msi for 32-bit systems.
- When the MSXML 6 installation is completed, then install QuickBooks Desktop.
- Download and Install MSXML 6.0 SP1
- You have to download the msxml.msi installation file and save it on the desktop.
- Then, press the right-click on the msxml.msi file and choose the Run as Administrator option.
- Install MSXML 6.
- When the MSXML 6 installation is completed, then install Quickbooks Desktop.
- Uninstall and Reinstall MSXML 6.0
- Click on the Windows Start button.
- In the search bar, type Programs and Features and press the Enter tab. Or, type APPWIZ.CPL and press the Enter tab.
- You have to choose MSXML 6.0 and click on the Uninstall/Change button.
- Follow the instructions that display on your screen, to remove MSXML 6.0.
- After that, you have to download the msxml.msi installation file and save it to the desktop.
- Press double-click on the msxml.msi file and continue the installation.
- When the MSXML installation is completed, then install QuickBooks Desktop.
Step 5: Install QuickBooks Desktop in Selective Startup mode
Follow these steps to install Quickbooks Desktop by using selective startup mode.
Step (i): Create your data
- First of all, you have to create a backup of your company file.
- Then, make a copy of your QuickBooks Desktop product and license info.
Step (ii): Start the system in Selective startup mode
- Firstly, you have to press the Windows+R key to open the Run command.
- In the search bar, type msconfig and press the OK button.
- In the General tab, you must choose the Selective Startup and Load system services.
- In the Services tab, click on the Hide all Microsoft Services.
- Then, choose the Disable All option.
- After that, untick the Hide all Microsoft services checkbox.
- You have to ensure that, the Windows Installer checkbox is chosen from the service list.
- Then, click on the OK button.
- In the end, choose the Restart option on the system configuration window.
Step (iii): Uninstall or install QuickBooks Desktop
When your computer opens, uninstall Quickbooks Desktop. And, after some time you have to install it.
Step (iv): Go back to Normal Startup mode
- First of all, you have to press the Windows+R key to open the Run command.
- In the search bar, type msconfig and press the OK button.
- In the General tab, you must choose the Normal Startup.
- Then, click on the OK button.
- In the end, choose the Restart option on the system configuration window.