
QuickBooks Database Server Manager allows users to make the company’s network data file in the hosting computer. It comes with multi-user accessibility. If you wish to use multiple versions of QuickBooks Desktop then you have to install the QBDSM. Without installing, you can’t run multi-user mode in this software.
Procedure to Set up QuickBooks Database Server Manager
Before starting the installation process, you have to make sure that you have good internet connectivity.
Step 1: Download QB Database Server Manager
QuickBooks Database server manager is a part of QuickBooks Desktop. So, if you are downloading QuickBooks Desktop, the Database server manager will download automatically. These steps can help you to download QuickBooks Desktop.
- From the QuickBooks Product Download Page, you need to download QuickBooks Desktop.
- Save the downloaded file in a place, where you can easily access it.
- Then, you have to open the downloaded QuickBooks.exe file and tickmark on the Software License Agreement.
- After that, click on the Next option and enter the Product and License Number.
- You must choose the Installation type from Express, or Custom, and Network options.
- In the end, click on the Activate tab then download QuickBooks Desktop.
Step 2: Installation
The installation process depends on the server computer that hosts your company files. Follow these steps to install the QuickBooks Database server manager.
- Close all open programs on your server computer including QuickBooks as well.
- Then, you must open the downloaded file QuickBooks.exe.
- Follow the installation instructions which are displayed on your computer screen.
- When QuickBooks asks you about an install type, then choose Custom or Network Options.
- After that, click on the Next tab without choosing the ‘Express’ option.
- You have to choose the best option for your network setup and click on the Next tab. Both options can install the QuickBooks Database Server Manager.
- If you want to run the program on your computer, then choose I’ll be using QuickBooks Desktop on this computer, AND I’ll be storing… We suggest you choose this option.
- If you only want to run QuickBooks Database Server Manager on your computer, then choose I will NOT be using QuickBooks Desktop…
- Follow the instructions that are displayed on your computer screen.
- In the end, you have to click on the Install tab.
Step 3: Configure QBDSM
If you wish to use the default settings, you can skip this step to configure QuickBooks Database Server Manager.
- Firstly, you have to open the Windows Start menu.
- In the search bar, you must type Services and then open it.
- Then, choose QuickBooksDBXX and open it.
- Click on the General tab and look for the Service status section. If it’s running, then choose the Stop option.
- You have to choose the Automatic option from the Startup type dropdown menu.
- Then, click on the Logon tab and choose the Local System account option.
- You have to move to the Recovery tab.
- From every dropdown menu: First failure, Second failure, and Subsequent failures choose the Restart the Service option.
- In the end, you have to go back to the General tab and choose the Start option to restart Database Server Manager.
Step 4: Setup your firewall permissions
If your Windows firewall breaks internet access for particular QuickBooks programs or files, an error message will come on your screen. Follow the steps to set up your firewall.
Step (i): Configure the firewall manually
If the QuickBooks File Doctor tool is unable to troubleshoot your firewall problems, you can do it manually.
- Add QuickBooks Firewall port exception
- Firstly, you have to open the Windows Start menu.
- In the search bar, go for the Windows Firewall and open it.
- Then, you must choose the Advanced Settings option.
- Press a right-click on the Inbound Rules option. Then click on the New Rule tab.
- After that, choose the Port option and click on the Next button.
- Ensure that, TCP must be selected.
- Enter in the specific ports in specific Local Ports The port format is according to your version:
- QuickBooks Desktop 2017: 8019, 56727, 55373-55377.
- QuickBooks Desktop 2018: 8019, 56728, 55378-55382.
- QuickBooks Desktop 2019: 8019, XXXXX.
- QuickBooks Desktop 2020: 8019, XXXXX.
- When you enter the Port number, then go to the Next option.
- After that, you have to choose the Allow the Connection option and click on the Next tab.
- If asked, ensure that mark all profiles. Then, choose the Next option.
- After that, you have to create a rule with a name like QBPorts(year).
- If the process is completed, then click on the Finish button.
You have to repeat the same steps and make outbound rules. Follow the steps, except select Outbound Rules on step 4.
- Create QuickBooks Windows firewall exceptions
Follow these steps to create exceptions for every file on the table:
- Firstly, you have to open the Windows Start menu.
- In the search bar, type Windows Firewall and open it.
- Then, choose the Advanced Settings option.
- You have to press right-click on the Inbound Rules. Then click on the New Rule tab.
- Choose the Program option and click on the Next tab.
- After that, you have to choose This Program Path and click on the Browse option.
- Search and choose one of the executable files given below, then click on the Next tab.
DBManager.exe-C:\Program Files\Intuit\QuickBooks YEAR
QBDBMgrN.exe-C:\Program Files\Intuit\QuickBooks YEAR
- Choose Allow the Connection option and click on the Next button.
- If asked, ensure that all profiles are marked. Then, choose the Next option.
- After that, you must create a rule with a name like QBFirewallException(name.exe).
You have to repeat the same steps and create outbound rules. Follow the steps, except select Outbound Rules on step 4.
Step (ii): Reboot your computer
Some programs need to reboot your computer to save changes. If you’ve completed configuring the firewall, then reboot your computer and open QuickBooks.
Step 5: Update QuickBooks Database Server Manager
When you update QuickBooks Desktop, the QuickBooks Database Server Manager will update automatically. You have the option to QuickBooks Desktop automatically or manually.
Check the latest release is available:
- You have to open QuickBooks Desktop.
- Then, press F2 (or Ctrl+1) to open the Product Information window.
- After that, you must check your current version and release it.
Set up automatic updates
- Firstly, you have to go to the Help menu and choose the Update QuickBooks Desktop option.
- After that, click on the Update Now button.
- You have to choose the Get Updates to start the download.
- When the download is completed, then restart QuickBooks.
- When asked, you have to accept the option to install the new release.
Schedule the automatic updates
If you have not downloaded updates now, you can schedule them for later.
- you have to go to the Help menu and choose the Update QuickBooks Desktop option.
- After that, click on the Options tab.
- For automatic updates, click on the Yes icon.
- In the end, you have to choose the Close option.
When updates are available, QuickBooks automatically downloads them.
Set up manual updates
- Firstly, you have to download the latest update.
- Then, close your company files including QuickBooks.
- Open the Windows Start menu.
- In the search bar, search for QuickBooks Desktop then press right-click and click on the Run as administrator option.
- You have to go to the Help menu and choose the Update QuickBooks Desktop option.
- Click on the Options tab and choose Mark All then click on the Save tab.
- Then, move to the Update Now option and click on the Reset Update checkbox.
- When you have done, choose the Get Updates option.
- When the update is completed, you have to close and reopen QuickBooks Desktop. To install updates, click on the Yes icon.
- When the installation is completed, restart your computer.
Get updates from your website
Follow these steps to download updates from your website.
- You have to move to the Downloads & Updates page.
- Choose your country, from the Select Country dropdown.
- Choose your product, from the Select Product dropdown.
- You have to choose your version (year), from the Select Version dropdown.
- Then, click on the Search tab.
- You have to choose the Get Updates option. Save the file in a place, where you can easily access it.
- When the download is completed, you must open the file to install the update.
- When the installation is completed, restart your computer.
Step 6: Final Setup and How to use
After downloading and installing QuickBooks Database Server Manager, you are required to set up QBDBSM. Follow these steps to set up and use it.
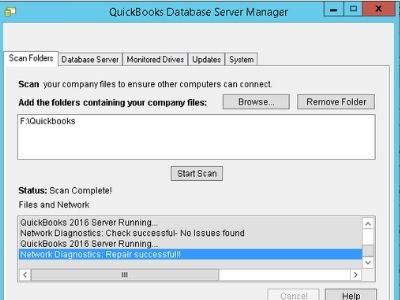
Step (i): Scan your folders
- The first step in this process is to move to the Start button.
- Then, click on the Programs tab and choose the QuickBooks Database Server Manager.
- You have to choose the Scan Folders option.
- Go to the Browse option and choose the folders that hold your company files (QBW).
- When the process is finished, click on the OK button.
- If you are ready, click on the Start Scan tab.
- Once the scan is completed, the folders appear in the QuickBooks company files found section.
Step (ii): Monitor your drives
After scanning folders, the drives show up in the Monitored Drives tab. You have to choose the drive to monitor these folders.
- Firstly, click on the Monitored Drives tab.
- Then, choose the checkboxes for the hard drives that hold your company files.
If you change your company files on the drive, you don’t need to rescan the folders.
Step (iii): Manage QuickBooks Database Server Manager
The System tab shows you the place where Database Server Manager is installed on your computer. The Database Server tab shows you the real-time status of the tool and who has connected with it.
Restart Database Server Manager
If you are unable to open Database Server Manager or see an error, we recommend you restart it. For your current setup, follow the steps to restart.
If you installed QuickBooks Desktop and Database Server Manager:
- Firstly, you have to open QuickBooks Desktop on your computer.
- Then, move to the File menu and choose Open or Restore Company.
- Choose Open a company file then search and open your company file and click on the Next tab.
- You have to choose the Open file in the multi-user mode checkbox and click on the Open tab.
- After that, log into your company file.
- Move to the File menu and choose Close Company/Log off. It will close your company file on the server.
- You must open the Windows Start menu.
- In the search bar, type Database, and open QuickBooks Database Server Manager.
If you only installed Database Server Manager:
- Firstly, you have to go to the Windows Start menu.
- Then, search for the Control Panel and open it.
- Choose the Administrative Tools and open it.
- From the list, you must choose the Services option.
- You have to press right-click on the QuickBooksDBXX service then choose the Restart option. XX is the year of your Database Server Manager.
- If Database Server Manager doesn’t restart, then restart your computer and follow these steps again.