
QuickBooks Clean Install tool helps users to repair their corrupt or damaged QuickBooks Desktop. We need to uninstall QuickBooks Desktop for Windows, rename the installation files then re-install the QuickBooks Desktop. This process is called the clean installation of QuickBooks. This tool also resolves the company file issues.
Procedure to Install and Use QuickBooks Install Tool
You can use the QuickBooks removal tool to perform a clean installation on QuickBooks Desktop successfully in two steps. The first step will be the primary step, in this step, you will be able to know, whether the clean installation is needed for you or not, and if needed then what should you do at the primary level. In the second step, you need to download and use the tool. Let’s know, how to do it;
Step 1: Primary Steps to Do before Clean installation
Follow some of the steps before downloading, and using the clean install tool:
Ensure that a Clean Install is Right for you
Before using the Clean Install tool, make sure that you are not able to fix issues by using a basic reinstallation of the QuickBooks Desktop, then you must use the clean install tool in QuickBooks Desktop to resolve the errors. Using a clean install tool will not affect your company data.
Get all the Information and Back Up your Data
Here is the procedure to take back up of data;
- Firstly, download a new install file for your QuickBooks version, then you can get the latest updates for your version.
- Then, you have to get the license number that you have received by email while purchasing.
- After that, note down the year and version of your product.
- Then, back up your company file to save your work.
Before backing up your company file, you have to create a company file. Backup company files save all your data in your company file. your accounting data, templates, letters, logos, images, and related files are included in this. You can backup your company file in two ways, automatically or manually.
Schedule Automatic Backup
- Firstly, move to the File menu and choose the Switch to Single-user Mode option.
- Again, you have to go to the File menu and click on the Backup Company tab.
- You must choose the Create Local Backup option.
- In the window, you have to choose the Local Backup option and then press the Next button.
- In the Local Backup Only section, choose the Browse option and choose the location where you want to save your backup company file.
- In the Online and Local Backup section, you must choose the Complete Verification option.
- Then, press the OK button.
- After that, choose the Save it Now schedule future backups option, and click on the Next button. Or if you don’t want to store a backup, then, choose the Only schedule future backups option.
- You have to choose the Save backup copy automatically when I close my company file checkbox and also choose the number of times between backups.
- Click on the New button to create a schedule and enter the data to create a backup schedule.
- After setting the schedule, you can click on the OK button.
- Then, you have to choose the Finish option.
- When the process is completed, you will get a confirmation message.
Manually Backup your company file
- Firstly, move to the File menu and choose the Switch to Single-user Mode option.
- Again, you have to go to the File menu and click on the Backup Company tab.
- Choose the Create Local Backup option.
- In the window, you have to choose the Local Backup option and then press the Next button.
- In the Local Backup Only section, choose the Browse option and choose the location where you want to save your backup company file.
- Then, click on the OK tab.
- You have to choose the Save it Now option and click on the Next tab.
Step 2: Perform Clean Installation in QuickBooks Desktop
Now follow the procedure to do a clean installation, by using the removal tool;
Uninstall the QuickBooks Desktop
First uninstall the QuickBooks desktop, by following the below procedure;
- Firstly, you have to open the Windows Start menu.
- In the search bar, you must type Control Panel and open it.
- Then, choose the Programs and Features option or Uninstall a Program option.
- Choose the QuickBooks Desktop version that has a problem.
- After that, you have to click on the Uninstall or Change option and follow the instructions on your screen.
Download and Install the QuickBooks Tool Hub
After the complete uninstallation process, download and install the tool hub;
- First of all, close QuickBooks Desktop, even all the running programs.
- Then, download the latest version of QuickBooks Tool Hub. (Latest version of tool hub- 1.5.0.0)
- The file will be on the QuickBooksToolHub.exe form.
- Save the downloaded file in a place, where you can easily access it.
- In the next step, open the downloaded file QuickBooksToolHub.exe file.
- After that, QuickBooks will show you some on-screen instructions, and follow them.
- And agree with the terms and conditions.
- After that, a popup will display on your computer screen with the License Agreement, you need to read this and click on the ‘Yes’ tab to accept it.
- Now you have to choose the destination location for QuickBooks Tool Hub and click on the Next button.
- Then, click on the Install option to start the installation.
- In the end, You must click on the Finish option.
- When the process is completed, you can open the tool.
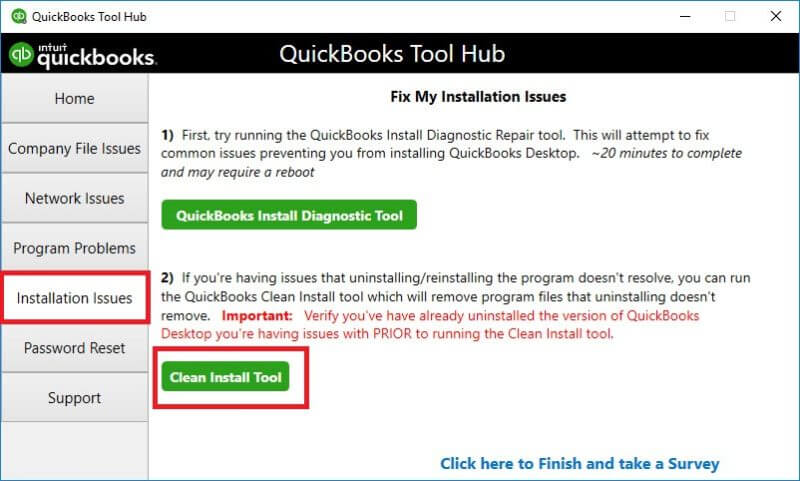
Run the QuickBooks Clean Install Tool
The Clean Install Tool renames your previous folders automatically and allows Quickbooks to add new install files. Below are the steps to run the QuickBooks Clean Install Tool.
- In the QuickBooks Tool Hub, you must choose the Installation Issues option.
- You have to choose the Clean Install Tool option and click on the OK button.
- Then, choose your QuickBooks version and Product version and click on the Continue button.
- You can see a message on your screen like ‘Please install your copy of QuickBooks to the default location’, then press the OK tab.
When you are done, you can uninstall the QuickBooks Desktop.
Rename QuickBooks Desktop Installation Folder:
When you’re using QuickBooks 2020 or if the clean install tool doesn’t resolve the issue, you can rename the folders manually:
- Firstly, you have to open the Windows Start menu.
- In the search bar, you must type File Explorer and open it.
- Then, you have to find and open the folder that has your QuickBooks company files. This is your QuickBooks folder and generally in one of these locations:
- C:\ProgramData\Intuit\QuickBooks (year)
- C:\Users\(current user)\AppData\Local\Intuit\QuickBooks (year)
- C:\Program Files\Intuit\QuickBooks (year)
- 64-bit version C:\Program Files (x86)\Intuit\QuickBooks (year)
- You must press right-click on the folder and choose the Rename option.
When you are done, you can reinstall QuickBooks Desktop.
When you receive an access error message:
- First of all, press right-click on the Windows Taskbar and choose the Task Manager.
- Then, you have to click on the Processes button.
- To sort the list, choose the Name column.
- After that, you have to choose the following process and click on the End Process tab for each: QBDBMgrN.exe, QBDBMgr.exe, QBCFMonitorService.exe, and Qbw32.exe.
- If you get a message like ‘WARNING: Terminating a process can cause undesired results…’, then click on the Yes button.
When you are done, you can reinstall QuickBooks Desktop.
Reinstall the QuickBooks Desktop
If the process is completed, then download the QuickBooks Desktop and reinstall it.